This articel i explain how to configuration mikrotik using pc for router.
1. Configuration position of ADSL connection
modem —Mikrotik—-Switch —– Client
|
Client
a. Modem IP –>> 192.168.1.1
b. Mikrotik Using 2 Interface - Ether1 —->> 192.168.1.2
- Ether1 —->> 192.168.0.254
c. Switch — Client ip 192.168.0.1-253
2. Configuration step router pc mikrotik
a. add ip address to interface 1
/ip address add interface=ether1 address = 192.168.1.1 netmask= 255.255.255.0
b. add ip address to interface2
/ip address add interface=ether2 address = 192.168.0.1 netmask= 255.255.255.0
c. to see input of interface
/interface print
d. Set Value name off interface
/inteface set 0 name=”Public” –>> For Modem
/inteface set 1 name=”Lan” –>> For Lan
e. set routing for net ( modem )
/ip route add gateway=192.168.0.1
f. set dns server ISP
/ip dns set primary-dns=203.130.193.74 secondary-dns=202.134.0.155
/ip dns set allow-remote-requests=yes
g. set of nat the router pc to sharing bw to lan
/ip firewall nat add chain=srcnat out-inteface=Public action=masquerade


Installing PHP
Generally, the installation process of Apache with PHP is very similar to the process of installing Apache without PHP, as described in the previous article. The only difference is the use of two additional modules: mod_php and mod_security.
As in the previous article, we will start by creating an account and group called "apache". Then we must prepare the Apache web server as follows:
cd apache_1.3.27
./configure
and compile the PHP module:
cd ../php-4.3.2
./configure --with-mysql=/usr/local/mysql --with-apache=../apache_1.3.27 --enable-safe-mode
make
su
make install
Next, we move to the directory with Apache source, and continue installation:
cd ../apache_1.3.27
./configure --prefix=/usr/local/apache --disable-module=all --server-uid=apache --server-gid=apache --enable-module=access --enable-module=log_config --enable-module=dir --enable-module=mime --enable-module=auth --activate-module=src/modules/extra/mod_security --enable-module=security --activate-module=src/modules/php4/libphp4.a
make
su
make install
chown -R root:sys /usr/local/apache
In the above "./configure" command, only those modules that are necessary to fulfill functionality and security assumptions are used. The choice of modules was discussed in details of the previous article. Now the next step is to return to the PHP directory and to copy the default PHP configuration file:
cd ../php-4.3.2
mkdir /usr/local/lib
chmod 755 /usr/local/lib
cp php.ini-recommended /usr/local/lib/php.ini
chown root:sys /usr/local/lib/php.ini
chmod 644 /usr/local/lib/php.ini
In order for the PHP scripts to be properly handled by the Apache web server, the following line should be added to /usr/local/apache/conf/httpd.conf:
AddType application/x-httpd-php .php
At this point we can try to run Apache and check if PHP can properly communicate with MySQL. We can achieve this by using the sample "test.php" script with the following content (the "user_name" and "password" values should be changed in accordance with installed database):
< ? php
$link = mysql_connect("localhost", "user_name", "password")
or die;
print "Everything works OK!";
mysql_close($link);
? >
The above web page can be viewed by using any Internet browser. If PHP instructions are properly interpreted and a connection to MySQL is established, we can start securing the software. If not - we should analyze the Apache and MySQL log files and eliminate the cause of the problems.
Installing MySQL
Before we start securing MySQL, we must install the software on the server. As in the previous articles, we will start installation by creating a unique, regular group and user account on the operating system, which will be dedicated to the MySQL database:
pw groupadd mysql
pw useradd mysql -c "MySQL Server" -d /dev/null -g mysql -s /sbin/nologin
Compiling MySQL
We will compile and install MySQL software in the /usr/local/mysql directory:
./configure --prefix=/usr/local/mysql --with-mysqld-user=mysql --with-unix-socket-path=/tmp/mysql.sock --with-mysqld-ldflags=-all-static
make
su
make install
strip /usr/local/mysql/libexec/mysqld
scripts/mysql_install_db
chown -R root /usr/local/mysql
chown -R mysql /usr/local/mysql/var
chgrp -R mysql /usr/local/mysql
In general, the process of installing the server is almost identical to the one described in the MySQL manual. The only change is the use of a few additional parameters, specified in the ./configure line. The most important difference is the use of --with-mysqld-ldflags=-all-static parameter, which causes the MySQL server to be linked statically. This will significantly simplify the process of chrooting the server, as described in Section 3. With regard to the other parameters, they instruct the make program to install the software in the /usr/local/mysql directory, run the MySQL daemon with the privileges of the mysql account, and create the mysql.sock socket in the /tmp directory.
2.2 Copy configuration file
After executing the above commands, we must copy the default configuration file in accordance with the expected size of the database (small, medium, large, huge). For example:
cp support-files/my-medium.cnf /etc/my.cnf
chown root:sys /etc/my.cnf
chmod 644 /etc/my.cnf
2.3 Start the server
At this point MySQL is fully installed and ready to run. We can start the MySQL server by executing the following command:
/usr/local/mysql/bin/mysqld_safe &
Test the connection
Try to establish a connection with the database as follows:
/usr/local/mysql/bin/mysql -u root mysql
Welcome to the MySQL monitor. Commands end with ; or \g.
Your MySQL connection id is 2 to server version: 4.0.13-log
Type 'help;' or '\h' for help. Type '\c' to clear the buffer.
mysql> show databases;
+----------+
| Database |
+----------+
| mysql |
| test |
+----------+
2 rows in set (0.00 sec)
mysql> quit;
Once the connection is successfully established, we can shutdown the database:
/usr/local/mysql/bin/mysqladmin -u root shutdown
and start securing the software. Otherwise, we should analyze the information stored in the /usr/local/mysql/var/`hostname`.err log file, and eliminate the cause of any problems.
Hi All,
We are looking for a Technical Support Officer for a web hosting company. The successful applicants will be based in Sunter, Jakarta Utara.
SALARY: Rp. 1.000.000 - Rp. 2.000.000/Month
MONTHLY BONUS: Rp. 100.000 - Rp. 1.000.000
KEY RESPONSIBILITIES:
- Troubleshooting problems in real-time (diagnostics and problem resolutions) .
- Providing technical supports to clients.
TECHNICAL REQUIREMENTS:
- Familiar and understand various internet application (email, browser, FTP, etc).
- Familiar and understand LAMP (Linux, Apache, MySQL, PHP) and Networking.
- Familiar and understand various open source internet application (Joomla, osCommerce, etc)
GENERAL REQUIREMENTS:
- Male, max 30 years old.
- Indonesian citizen.
- Not married.
- Relevant tertiary qualification (at least diploma degree in Computer Science or Information Technology)
- Fresh graduated are welcome.
- Able to work in night shifts
- Ability to work independently and/or within the team.
- Consistent, professional, friendly phone presentation. Ability to explain simple and complicated problems repeatedly.
- Ability to develop and maintain a good relationship with partners and other companies.
- Excellent and concise writing and oral capabilities in English and Indonesian.
- Ability to deliver consistent results in combined stressful and relaxed work environments.
To apply you MUST possess the above skills and experience. Only shortlisted candidates will be contacted.
Shortlisted candidates will be required to complete a questionnaire, and then will be followed by practical test.
If you are interested to join our vibrant company, please send your CV, Cover Letter and newest photograph to jobs@imediabiz. com.
Please put TSO2008 in your email subject.
Thanks
HRD Department
Imediabiz Pty Ltd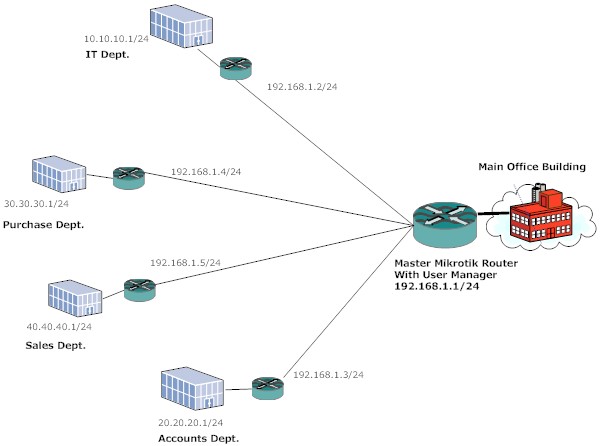
Generally we are using external Radius servers for user authentication as MikroTik is not Radius server. But here in this example we use the MikroTik User Manager which works as a Radius server and does authentication and control of your Hotspot users.
Requirements
Central location: MikroTik OS with User Manager (suggested License is L6).
Hotspot: Mikrotik Routerboard with at least a L4 License
Network 192.168.1.0/24
R1-Hotspot Master
WAN IP-
LAN IP – 192.168.1.1/24

R2-Hotspot IT Dept
WAN IP – 192.168.1.2/24
LAN IP – 10.10.10.1/24

R3-Hotspot Account Dept.
WAN IP – 192.168.1.3/24
LAN IP – 20.20.20.1/24

R4- Hotspot Purchase Dept
WAN IP – 192.168.1.4/24
LAN IP – 30.30.30.1/24

R5- Hotspot Sales Dept.
WAN IP – 192.168.1.5/24
LAN IP – 40.40.40.1/24
We assume that all the setup is ready and the hotspot is configured on R2, R3, R4, and R5 with local authentication.
First, we will configure R2, R3, R4 & R5 to use MikroTik user manager as a Radius server.
/ip hotspot profile
use-radius=yes


/radius add
service=hotspot address=192.168.1.1 secret=123456

This configuration will apply to all the Hotspot router.
Now, we will configure R1-Hotspot Master.
/tool user-manager customer add
subscriber=mikrotik login="mikrotik" password="ashish" time-zone=+05:30
permissions=owner parent=mikrotik

/tool user-manager router add
subscriber=mikrotik name="R2" ip-address=192.168.1.2 shared-secret="123456"

subscriber=mikrotik name="R3" ip-address=192.168.1.3 shared-secret="123456"

subscriber=mikrotik name="R4" ip-address=192.168.1.4 shared-secret="123456"

subscriber=mikrotik name="R5" ip-address=192.168.1.5 shared-secret="123456"
and finally add the user on R1
/tool user-manager user add
username=ashish password=ashishpatel subscriber=mikrotik
The user name and password will work for all the remote hotspot router…a user can login from any department of the company with same ID and password and we can have all the user data centrally.
Now you can log into the User Manager web interface on the address http://192.168.1.1/userman and start setting up your user accounts.
More information in the User Manager section.